
Preview:
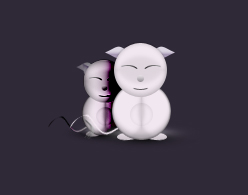
Cute Mascot Design.
Step 1:
Let’s start out by creating a new file. I used a 300×300 pixels canvas set at 72dpi, and I filled my background with #2F2937 color shade. Now create a layer then draw a white ellipse with #F1E7F0 color shade and 58 x 59 px dimensions.

Step 2:
Under Layer Style(Layer > Layer Style) add an Inner Shadow, Inner Glow and Satin blending options to the white ellipse layer
Result:
Step 3:
In a new layer draw a smaller white ellipse with #F1E7F0 color shade and 53 x 54 dimensions stacked on the first white ellipse design.
Step 4:
Under Layer Style(Layer > Layer Style) add a Drop Shadow, Inner Shadow, Inner Glow and Satin blending options to the second white ellipse layer.
Result:
Step 5:
Select the Custom Shape Tool and select the circle thin frame shape from the selection. In a new layer add a black circle thin frame by the second white ellipse design. Then do some erasing to get the eye brow design for the mascot.
Step 6:
Add the other eye brow and the mouth by doing the same steps for the first eye brow. Then in a new layer draw a small black circle for the nose.

Step 7:
Under Layer Style(Layer > Layer Style) add a Gradient Overlay blending option to the small black circle layer.
Result:

Step 8:
In seperate layers add two small white ellipses for the feet as shown below.
Step 9:
Under Layer Style(Layer > Layer Style) add an Inner Shadow blending option to the small white ellipses layer for the feet.
Result:

Step 10:
Select the Custom Shape Tool and select the Fleur-de-lis shape from the shape selection. In a new layer create a small fleur-de-lis shape with #DAD4E0 color shade. Then erase the left and right shapes from the fleur-de-lis shape as shown below. Rotate the center small shape through Edit > Transform, which will be the left ear of the mascot.
Step 11:
Under Layer Style(Layer > Layer Style) add a Gradient Overlay blending option to left ear shape layer.

Result:

Step 12:
Add the right ear design by duplicating the original and rotate it through Edit > Transform. Then in a new layer draw a small white circle with 23 x 23 dimensions on the body design of the mascot.

Step 13:
Under Layer Style(Layer > Layer Style) add an Inner Shadow blending option to the white circle layer. Then set the layer's blending mode to Darken.
Result:

Step 14:
Now use the Pen Tool to create a tail for your cute mascot.
Results:
Cute Mascot Design.